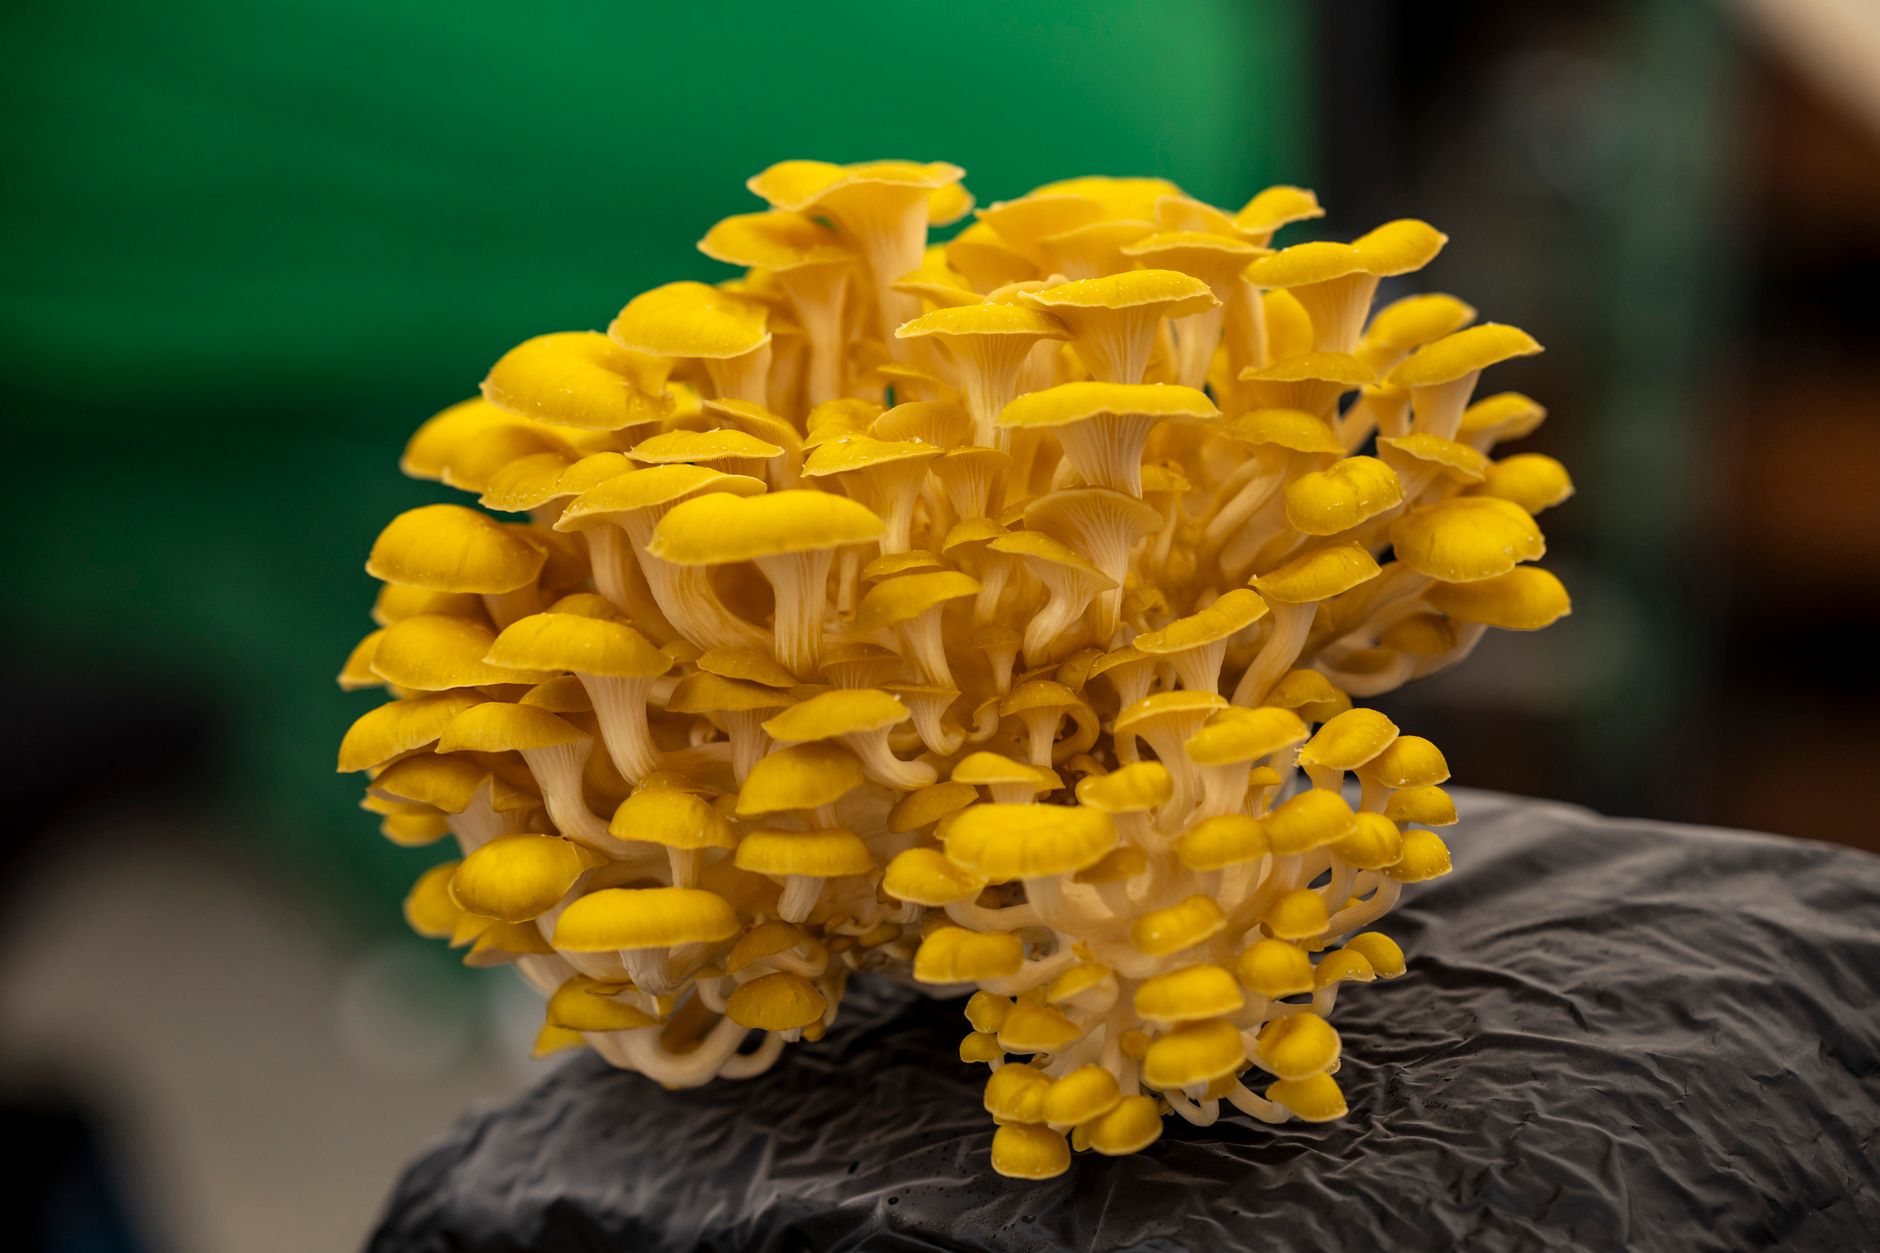
Golden oyster mushrooms (Pleurotus citrinopileatus) are one of the fastest and most forgiving species for home growers. Their bright yellow caps and delicate, nutty flavor make them a standout in any kitchen. If you have grown other oyster varieties, you already know the basics. The guide how to grow oyster mushrooms at home covers general oyster cultivation. This species guide focuses on the golden oyster’s specific needs for substrate, temperature, humidity, and harvesting. Even beginners can get a first crop within a month.
The golden oyster is a saprophytic mushroom that decomposes hardwood and straw. It grows fast and produces heavy clusters, often pinning before the substrate is fully colonized. Penn State Extension has published several bulletins on oyster mushroom cultivation. Their research confirms that oyster mushrooms grow well on pasteurized agricultural byproducts. For golden oysters, straw and supplemented sawdust both work. Use clean spawn and a well-prepared substrate to tip the odds in your favor.
Golden oysters are tropical and warm-loving. They colonize best at 70-80°F and fruit well at 65-75°F. High humidity between 85% and 95% helps pins form and caps expand. Fresh air exchange is just as important as moisture. Without enough air, golden oysters grow long thick stems and small caps. A simple diy mushroom fruiting chamber guide can turn a plastic tote into a controlled space. Keep a spray bottle and hygrometer nearby to check conditions daily.
Like all mushrooms, golden oysters are safe when cultivated from known spawn and cooked thoroughly. Do not eat any wild mushroom unless an expert identifies it. Cultivated golden oysters are easy to distinguish by their yellow caps and white stems. The spores are also yellow and can coat nearby surfaces. Harvest clusters young to reduce spore release in your home. With proper planning, you can grow these mushrooms on a kitchen counter or in a small closet.
What You’ll Need
- Mushroom grow bags with filter patches
- Golden oyster grain spawn or liquid culture
- Pasteurized straw or supplemented hardwood sawdust
- Large pot or pressure cooker for pasteurization
- Spray bottle or humidity controller
- Hygrometer and thermometer
- Clear plastic tote or fruiting chamber
How Do You Grow Golden Oyster Mushrooms at Home?
- Understand golden oyster mushroom traits and safety
Golden oyster mushrooms (Pleurotus citrinopileatus) are tropical saprophytes that grow on dead hardwood. They produce bright yellow, thin-fleshed caps that fade as they mature. The gills run down a short white stem. The spores are pale yellow to buff and can be heavy at maturity. Because they pin so early, you often see tiny yellow primordia before the substrate block is fully white. That is normal for this species. Still, you should let the block colonize for at least 7 days before moving it to fruiting.
This mushroom is forgiving, but it still needs specific conditions. Colonization works best at 70-80°F (21-27°C). Fruiting does best at 65-75°F (18-24°C). Relative humidity must stay between 85% and 95% during pinning and cap expansion. Spawn run on pasteurized straw takes about 7-14 days. On supplemented sawdust blocks, it can take 10-18 days. Those data points will help you plan your grow.
Safety matters before you start. Cultivated golden oysters are easy to recognize. Wild mushrooms require expert identification. If you ever forage, follow the guidelines from the North American Mycological Association. A misidentified mushroom can be deadly. In the grow room, watch for green or black mold. Check our mushroom contamination identification guide to learn what healthy mycelium looks like.
- Gather supplies and choose clean spawn
Start with clean supplies. You will need golden oyster grain spawn, mushroom grow bags or buckets, substrate material, a large pot, a clean work surface, and gloves. A spray bottle and a hygrometer help later. For spawn, buy from a reputable supplier or use a kit from our best mushroom grow kits 2026 roundup. Grain spawn should smell fresh and slightly fungal. Avoid bags with wet spots, green mold, or sour odors. Use Check mushroom grow bags on Amazon to find bags with filter patches for fresh air.
Cleanliness determines success. Wash your hands and wipe down tables with 70% isopropyl alcohol. Flame sterilize any metal tools if you plan to cut spawn bags open. Work in a still room with windows closed. Golden oyster mycelium grows fast, but mold also loves the same warm, humid conditions. A single contaminated spawn bag can ruin an entire batch.
Prepare your spawn by breaking up the grains gently. Use clean hands inside a clean bag or a sanitized bowl. The spawn should be loose and free of clumps. This makes it easier to mix evenly into the substrate. Measure the right amount before you start inoculating. For most straw or sawdust grows, use 5-10% spawn by wet weight. That means about 1 pound of spawn for every 10 to 20 pounds of substrate.
- Prepare and pasteurize a suitable substrate
Golden oysters grow well on pasteurized wheat straw, oat straw, or supplemented hardwood sawdust. A simple straw recipe is 5 pounds of chopped straw pasteurized at 160-170°F for one hour. Drain and squeeze until the straw is about 70-75% moisture. A sawdust block recipe uses 80% hardwood sawdust, 20% wheat bran, and water to 60-65% moisture. Both recipes work, but straw is cheaper and easier for beginners. Learn the full method in our how to pasteurize straw for mushrooms guide.
Pasteurization kills many competitors while leaving helpful microbes alive. Do not overheat the straw above 180°F. That can break down the straw and invite mold. A large pot or insulated cooler works well for hot water pasteurization. After heating, let the straw drain and cool to room temperature before adding spawn. Hot substrate can kill your golden oyster mycelium.
If you use sawdust, mix the dry ingredients first, then add water gradually. A squeeze test works well. Grab a handful and squeeze hard. Only a few drops should come out. If water runs freely, the substrate is too wet. If it crumbles apart, it is too dry. Adjust before packing into bags.
- Inoculate substrate with golden oyster spawn
Fill your grow bag or bucket with alternating layers of substrate and spawn. Start with a thin layer of straw, then sprinkle spawn, then add more straw. Press gently to remove large air pockets. Keep the mixture loose enough for air to move. Use 5-10% spawn by wet weight for fast colonization. Do not pack the bag too tightly or mycelium will struggle to breathe.
Seal the bag with the filter patch facing up. If you use a bucket, drill small holes and cover them with micropore tape. The filter patch allows gas exchange while keeping out mold spores. Give the bag a gentle shake after sealing to distribute spawn grains. Even distribution leads to an even pin set later.
Label the bag with the species and date. Write it on tape or use a permanent marker. Place the bag in a warm spot away from direct sunlight. Check the moisture level through the bag. You should see tiny droplets on the inside. If condensation drips down the sides, the substrate may be too wet. If it looks dry, mist the filter patch lightly, not the substrate itself.
- Incubate spawn run in a warm dark space
Incubation is the waiting game. Golden oyster mycelium colonizes fastest at 70-80°F (21-27°C). Keep the bag in a dark or dim space such as a closet, cabinet, or under a table. Darkness is not required, but bright light can trigger pinning too early. At these temperatures, straw usually colonizes in 7-14 days. Sawdust blocks take 10-18 days depending on spawn rate and moisture.
Check the bag every few days. Healthy mycelium is white, web-like, and slightly fuzzy. It may smell like fresh mushrooms. As colonization progresses, you may see small yellow dots. Those are early pins, not contamination. Golden oysters pin early and often. If you see green, blue, or black patches, separate the bag from your grow area. Review our mushroom fruiting conditions guide when the block is almost ready so you can set up the next stage.
When the bag is mostly white and feels rubbery, it is ready for fruiting. You can wait one or two extra days for full colonization. Do not wait until the pins get long inside the bag. Move the bag to your fruiting chamber as soon as the first pins appear.
- Set up fruiting conditions and trigger pinning
Set up your fruiting chamber before the block is fully colonized. A clear plastic tote, a small grow tent, or a shelf covered with a plastic drop cloth can work. Follow our diy mushroom fruiting chamber guide to build one. The chamber needs 85-95% relative humidity, fresh air exchange, and indirect light. Use a hygrometer to monitor humidity. A Check humidity controller on Amazon can automate a small humidifier.
Cut an X or slit in the grow bag to expose the colonized block. Golden oysters will pin from any opening. Place the bag upright or hang it in the chamber. Mist the walls of the chamber, not the mushrooms directly. Direct misting can bruise young pins and cause bacterial blotch. Keep the temperature between 65-75°F (18-24°C).
Pinning usually starts 3-7 days after you introduce fresh air and light. The first pins look like tiny yellow clusters. They double in size quickly. Give them bright, indirect light for 10-12 hours per day. A shaded window or a cool white LED works. Direct sun can dry out the caps.
- Maintain humidity, fresh air, and light while fruiting
Once pins form, the next 5-10 days decide quality. Keep relative humidity at 85-95%. If humidity drops below 80%, pins may abort or caps may crack. Mist the chamber walls two or three times daily. Fan the chamber for 30 seconds after misting to push out stale air. Golden oysters need 4-6 complete air exchanges per hour. If carbon dioxide builds up, stems stretch and caps stay small.
Watch the fruiting block daily. The mushrooms grow fast and can double overnight. A cluster is ready when the caps are still convex, before the edges flatten and curl up. Yellow caps may fade to pale yellow at maturity. Harvesting young reduces spore load and keeps the texture tender.
If the mushrooms look leggy with small caps, increase fresh air. If caps look dry or cracked, raise humidity. If colors look pale, check that the light is bright enough and the temperature is not above 80°F. Small adjustments often fix problems within one or two days.
- Harvest, store, and plan subsequent flushes
Harvest golden oyster clusters by grasping the base and twisting gently. You can also cut the cluster with a clean knife. Do not pull hard or you will tear the substrate. Harvest the whole cluster at once to keep the block clean. Young caps have the best flavor and texture. Mature caps shed heavy yellow spores, which can irritate lungs and coat your grow area.
Store fresh golden oysters in a paper bag in the refrigerator. They keep for 5-7 days if dry and cool. Do not store them in sealed plastic or they will get slimy. Cook them thoroughly before eating. Golden oysters have a soft texture and a nutty, slightly peppery flavor. They work well in stir-fries, soups, and pasta.
After harvest, the block can produce more flushes. Soak the block in cold water for 12-24 hours. Drain well and return it to the fruiting chamber. You may get two to four flushes from one block. Each flush will be smaller than the last. When contamination appears or the block stops producing, compost it.
Red Flags & Warnings
- 🚨 Golden oyster mushrooms release heavy yellow spore loads once caps flatten. Harvest clusters before edges curl upward. Wear a dust mask while harvesting if you have allergies or asthma.
- 🚨 Never eat a wild mushroom unless an expert positively identifies it. The North American Mycological Association warns foragers against guessing. Cultivated golden oysters from clean spawn are safe to eat when cooked.
- 🚨 Green, black, or sour-smelling growth signals contamination. Discard the entire bag outdoors. Do not open contaminated bags inside your home or near your grow area.
- 🚨 Overheating straw above 180°F during pasteurization can kill beneficial microbes. That creates an open niche for green mold after inoculation.
- 🚨 Low humidity below 80% causes golden oyster pins to abort or caps to crack. Use a hygrometer and mist chamber walls daily to keep humidity between 85% and 95%.
- 🚨 Poor fresh air exchange leads to leggy stems and small caps. Golden oysters need at least 4 air exchanges per hour. Fan the chamber often or use a low-speed fan.
Frequently Asked Questions
How long do golden oyster mushrooms take to grow?
From spawn to harvest, plan on 3-5 weeks total. Spawn run takes 7-14 days on straw and 10-18 days on sawdust. Pinning starts 3-7 days after moving to fruiting conditions. Harvest follows 5-10 days later.
Can I grow golden oyster mushrooms on coffee grounds?
Yes, but coffee grounds are prone to green mold. Mix them with pasteurized straw or sawdust at 20-50% coffee grounds. Keep the substrate at 70% moisture and watch for contamination.
What temperature is best for golden oyster mushrooms?
Colonize at 70-80°F (21-27°C). Fruit at 65-75°F (18-24°C). Golden oysters tolerate temperatures up to 80°F but may produce paler caps. Avoid frost.
Why are my golden oyster mushrooms small and leggy?
Small caps with long, stretched stems usually mean too little fresh air. Golden oysters need 4-6 air exchanges per hour. Increase fanning or add a low-speed fan in the fruiting area.
Do golden oyster mushrooms need light to fruit?
Yes. They need bright, indirect light for 10-12 hours daily. Direct sunlight can dry them out. A cool white LED or shaded window works well.
Can I grow golden oysters from a store-bought mushroom?
It is possible to clone tissue on agar, but results are inconsistent for beginners. Buy liquid culture or grain spawn from a trusted supplier. Growing from store-bought stems may introduce bacteria if not done in sterile conditions.
What Should You Remember?
- Fast colonizer: Golden oyster spawn run finishes in 7-14 days on pasteurized straw.
- Fruiting trigger: Move to 65-75°F with 85-95% humidity and bright indirect light.
- Spore control: Harvest clusters while caps are still convex to reduce yellow spore load.
- Substrate: Use pasteurized straw or supplemented hardwood sawdust at 70% moisture.
- Fresh air: Provide 4-6 air exchanges per hour or mushrooms grow leggy and small.
- Second flush: Soak the block for 12-24 hours after harvest to encourage another flush.
This article is for general information only. Mushroom identification and consumption carry health and safety risks , never eat a wild mushroom unless positively identified by an expert, and follow sterile technique and food-safety guidance for home grows.