Quick Answer
The easiest way to grow oyster mushrooms at home is with a ready-to-fruit grow kit — cut an X in the bag, mist daily, harvest in 7-14 days. For DIY methods, pasteurized straw logs inoculated with grain spawn produce the highest yields. Oyster mushrooms grow on many substrates (straw, coffee grounds, sawdust) and are the most beginner-friendly mushrooms to cultivate.
Oyster mushrooms (Pleurotus ostreatus) and related species are the gateway drug of mushroom cultivation. They're fast-growing, aggressive colonizers that fruit on a wide range of cheap substrates. Unlike shiitake or lion's mane, which require specific hardwood substrates and longer incubation, oysters will grow on straw, coffee grounds, cardboard, and even old books.
This guide covers four methods, from absolute beginner (grow kits) to intermediate (bucket tek, straw logs). We'll explain which oyster varieties work best indoors, how to avoid common contamination issues, and how to get multiple flushes from your setup.
Why Grow Oyster Mushrooms?
- Fast: From kit to harvest in 7-14 days
- Forgiving: Tolerate a wider range of temperatures and humidity than most mushrooms
- High yield: 1 lb of fresh mushrooms per 1 lb of dry substrate is common
- Versatile: Grow on straw, coffee grounds, sawdust, cardboard, paper
- Delicious: Meaty texture, mild flavor that absorbs seasonings well
- Medicinal: Contain lovastatin (cholesterol-lowering), beta-glucans (immune support), and antioxidants
If you can only grow one type of mushroom at home, make it oysters. They're the most rewarding for beginners.
Method 1: Grow Kits (Absolute Beginner)
Grow kits are pre-colonized blocks of substrate (usually hardwood sawdust or straw) that just need fruiting conditions. We recommend the Back to the Roots Oyster Mushroom Kit — it's widely available, reliable, and comes with clear instructions.
Step-by-Step Kit Instructions
- Open and soak: Remove the block from its box. Soak the entire block in cold water for 8-12 hours (overnight). This hydrates the mycelium and triggers fruiting.
- Cut and place: Cut two X-shaped openings (3-4 inches each) on opposite sides of the bag. Place the block in its included humidity tent or make your own with a clear plastic bag propped up with sticks.
- Mist 2-3x daily: Oysters need 80-90% humidity. Mist the inside of the tent, not directly on the mushrooms. If you see pins drying out or turning brown, increase misting frequency.
- Provide light and air: Indirect light for 12 hours/day (a north-facing window is perfect). Fresh air exchange is critical — oysters produce lots of CO2. Open the tent briefly 2-3 times daily, or cut small holes in the bag.
- Watch for pins: Within 3-7 days, you'll see clusters of tiny gray/brown pins emerging from the cuts. These grow rapidly — sometimes doubling in size daily.
- Harvest at the right time: Harvest when caps are still slightly curled under (not fully flattened). Oysters are best young and tender. Twist and pull the entire cluster at the base.
- Second flush: After harvesting, soak the block again for 12 hours. Return to fruiting conditions. Most kits produce 2-3 flushes over 4-6 weeks.
Back to the Roots Organic Oyster Mushroom Kit
USDA Organic · Grows in 10 days · Includes humidity tent · Kid-friendly · Free shipping
$19.99
Check Price on Amazon →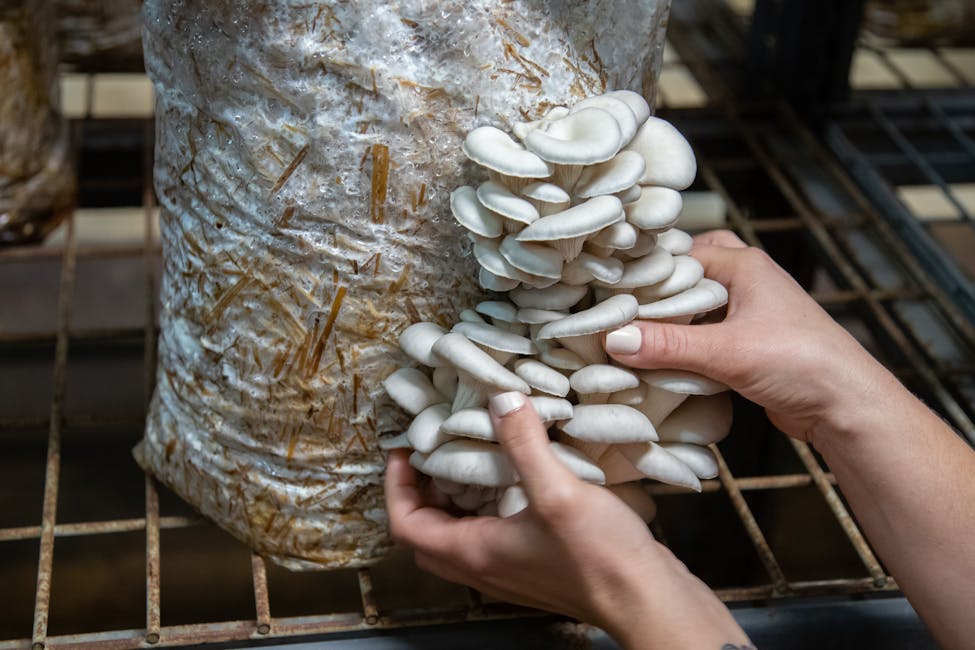
Method 2: Straw Logs (Most Productive DIY)
Straw is the classic substrate for oyster mushrooms. It's cheap ($5-10 per bale), readily available at farm stores, and oysters love it. The process: pasteurize straw, inoculate with grain spawn, pack into bags or buckets, and fruit.
What You'll Need
- Wheat or oat straw: One bale (40-50 lbs) makes 20-30 grow bags
- Oyster mushroom grain spawn: 1 lb spawn per 10 lbs pasteurized straw
- Large pot or barrel: For pasteurizing straw in hot water (160-180°F)
- Grow bags or buckets: Polypropylene bags with filter patches, or 5-gallon food-grade buckets with holes drilled in the sides
- Thermometer: To monitor pasteurization temperature
The Process
1. Chop and pasteurize straw: Chop straw into 2-4 inch pieces (a weed whacker in a garbage can works). Submerge in 160-180°F water for 60-90 minutes. Don't boil — boiling breaks down nutrients. Pasteurization kills competing organisms but leaves beneficial thermophilic bacteria.
2. Drain and cool: Drain straw in a colander until it stops dripping (should feel like a damp sponge, not soggy). Cool to room temperature — warm straw kills spawn.
3. Layer spawn and straw: In your grow bag or bucket, create alternating layers: 2 inches straw, sprinkle of spawn, repeat until full. Top layer should be straw. For buckets, drill ½-inch holes every 4-6 inches around the sides (mushrooms will fruit from these holes).
4. Incubate: Store bags/buckets in a dark area at 65-75°F for 10-14 days. The mycelium will colonize the straw, turning it white. Once fully colonized (no visible straw, all white), move to fruiting conditions.
5. Fruit: Cut X-shaped openings in bag sides, or leave bucket holes as-is. Maintain 80-90% humidity and provide indirect light. Mist 2-3x daily. Pins form in 5-10 days.
6. Harvest and rehydrate: Harvest entire clusters when caps are 2-4 inches across. Soak the entire bag/bucket in water for 12-24 hours between flushes. Straw logs produce 2-3 flushes over 4-8 weeks.
Method 3: Coffee Grounds (Apartment-Friendly)
Used coffee grounds are free, already pasteurized (the brewing process sterilizes them), and rich in nutrients. This method works well for small-scale growing in apartments.
Simple Coffee Grounds Method
- Collect used coffee grounds from your daily brew (or ask a local café). You'll need about 2 lbs of damp grounds per grow container.
- Mix grounds with 10-20% spawn by weight. Spawn can be grain spawn or even a piece of colonized substrate from a previous grow.
- Pack into a clean container with a lid (margarine tub, takeout container). Poke 4-5 small holes in the lid for air exchange.
- Incubate at room temperature for 7-10 days until fully colonized (white throughout).
- When colonized, open the lid and place in a humidity tent (a clear plastic bag with holes). Mist daily.
- Harvest when mushrooms reach desired size. Yields are smaller than straw but require almost no equipment.
Note: Coffee grounds are nutrient-rich and can contaminate easily. Use them within 24 hours of brewing, and don't mix with other substrates for this method.
Method 4: Bucket Tek (For Larger Yields)
The bucket method scales well and is perfect for growing multiple varieties simultaneously. You'll need 5-gallon food-grade buckets (often free from bakeries or restaurants).
Bucket Setup
- Drill ½-inch holes every 4-6 inches around the sides of the bucket. Drill a few small holes in the bottom for drainage.
- Pasteurize your substrate (straw, sawdust pellets, or a mix).
- Layer substrate and spawn in the bucket as with straw logs.
- Cover the top with a lid or plastic wrap during colonization.
- Once colonized (10-14 days), remove the lid and place the bucket in your fruiting area.
- Mist the holes directly 2-3x daily. Mushrooms will emerge from the holes.
- Harvest by twisting clusters out of the holes.
One 5-gallon bucket yields 2-4 lbs of mushrooms over multiple flushes. Stack buckets vertically to save space.
Choosing Oyster Varieties
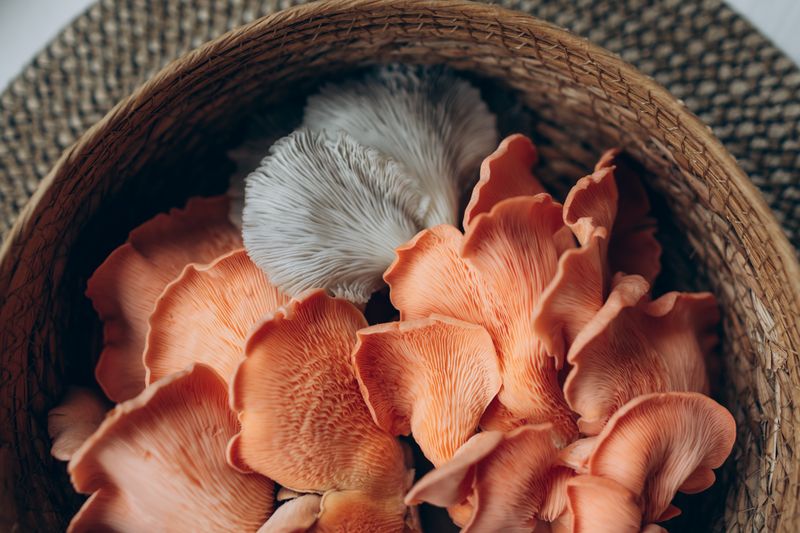
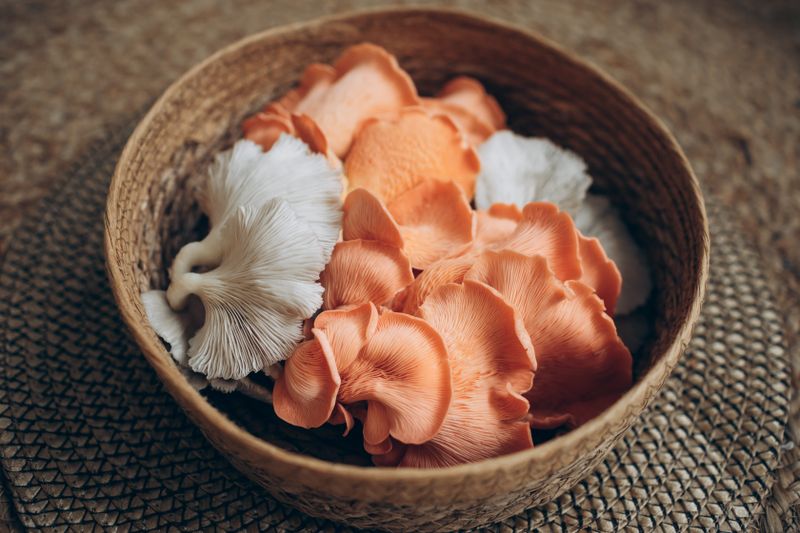
- Pearl Oyster (Pleurotus ostreatus): The classic. Gray/brown caps, grows 55-75°F, most forgiving for beginners.
- Blue Oyster (Pleurotus ostreatus var. columbinus): Beautiful blue-gray caps when young, prefers cooler temps (45-65°F), more sensitive to high CO2.
- Golden Oyster (Pleurotus citrinopileatus): Vibrant yellow, grows 65-80°F, aggressive colonizer, stunning visual appeal.
- Pink Oyster (Pleurotus djamor): Bright pink, tropical (70-85°F), fast-growing but short shelf life (eat within 24 hours of harvest).
- King Oyster (Pleurotus eryngii): Thick stems, mild flavor, grows on supplemented sawdust (not straw), commands premium price at markets.
For your first grow, choose Pearl or Blue oysters — they're the most reliable. Golden oysters are stunning but need more fresh air. Pink oysters are fun but don't store well.
Common Problems and Solutions
Long, Thin Stems with Small Caps
This is classic "stemmy" growth caused by high CO2. Oysters need fresh air exchange — they're measuring CO2 levels to know when they've reached open air. Increase ventilation: open windows briefly, use a small fan on low pointing away from the mushrooms, or add more holes to your fruiting chamber.
No Pinning After Full Colonization
Oysters need a temperature drop of 5-10°F to trigger fruiting. If your incubation was at 75°F, move to 65°F. Also ensure they're getting indirect light (they won't fruit in total darkness) and high humidity (80-90%).
Green Mold (Trichoderma)
The bane of mushroom growers. Green mold outcompetes mycelium. Prevention: proper pasteurization, clean workspace, don't over-hydrate substrate. If you see green spots early, cut them out with a clean knife and increase airflow. If it's widespread, discard the block outdoors.
Mushrooms Growing from Top Instead of Holes
This happens when the surface conditions (humidity, light, air) are better at the top than the sides. Either tape over the top to force side fruiting, or let them grow from the top — it's fine, just harder to harvest.
Harvesting and Storage
Harvest oyster mushrooms when the caps are still slightly curled under — before the edges flatten completely. Twist and pull the entire cluster at the base. Don't cut — leftover stumps can rot and invite contamination.
Fresh oysters store poorly compared to button mushrooms. Learn more about growing gourmet mushrooms from Penn State Extension. Keep them in a paper bag (not plastic) in the refrigerator for 3-5 days. For longer storage, sauté in butter and freeze, or dehydrate at 110-120°F for 8-12 hours. Dehydrated oysters rehydrate well in soups and stews.
Is It Worth Growing Oysters vs Buying?
Absolutely. A $20 grow kit yields 1-1.5 lbs of mushrooms ($10-15 value at grocery stores). DIY straw logs cost about $2-3 per pound to produce vs $8-12 store price. See our full guide on the best mushroom substrates for straw selection. Plus, home-grown oysters are fresher, more flavorful, and you control the growing conditions (organic, no pesticides).
For continuous harvest, stagger your grows: start a new kit or log every 2 weeks. With four buckets in rotation, you can harvest 1-2 lbs weekly year-round.
Frequently Asked Questions
What is the easiest way to grow oyster mushrooms at home?
The easiest method is using a ready-to-fruit grow kit. Simply cut an X in the bag, mist daily, and harvest within 7-14 days. No sterilization or special equipment needed. Oyster mushroom kits are the most reliable for beginners.
What materials can I use to grow oyster mushrooms?
Oyster mushrooms grow on many substrates: pasteurized straw (most common), hardwood sawdust, coffee grounds, cardboard, paper, and agricultural waste like corn cobs or sugarcane bagasse. They're less picky than other mushroom species.
How long does it take to grow oyster mushrooms?
From a grow kit: 7-14 days to first harvest. From spawn on straw: 2-3 weeks for colonization, then 5-10 days to fruit. Oysters are fast growers — you can have mushrooms in under a month from starting most methods.
What temperature do oyster mushrooms need?
Different oyster varieties prefer different temperatures: Blue oysters (45-65°F), Pearl oysters (55-75°F), Pink oysters (70-85°F), Golden oysters (65-80°F). Most home growers succeed with Pearl oysters at room temperature (65-75°F).
How many flushes do oyster mushrooms produce?
Oyster mushrooms typically produce 2-3 flushes over 4-8 weeks. The first flush is largest (60-70% of total yield). After each harvest, soak the substrate in water for 12-24 hours to rehydrate for the next flush.
Get weekly guides from GrowMushrooms
No spam. Unsubscribe anytime.